Custom Dialog layout

StefMa

StefMa

Dauergast
450
Hi,

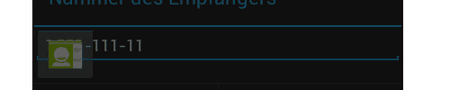
Ich habe ein Custom Dialog.
Dort habe ich eine edittext und ein button als Linearlayout horizontal.
Ich möchte dass das edittext "alles" ausfüllt, aber der button natürlich auch noch zu sehen ist.
Für den Button kommt also Match parent nicht in frage.

Wie mache ich das?
(es muss komplett in Java passieren. XML kann ich nicht benutzen!)

Noch eine Frage dszu:
Auf den Button möchte ich gerne ein image legen. Also speziell das von Stock android für die Kontakte. Darf ich das image benutzen? Ist das auch "open source"?
Oder kann ich auch iwie das image von der entsprechenden Kontakte app von der jeweiligen oberflächlich benutzen?

Danke und Gruß

Gesendet von meinem Galaxy Nexus mit der Android-Hilfe.de App
 
Sollte sich erstmal erledigt haben.
Benutze ein RelativeLayout.
Als icon benutze ich flaticons von mitch :) - Danke dafür!
 
Hier der Code:
Code:
    	// Adde dem LinearLayout das TextFeld und den "Kontakt-Chooser"
        RelativeLayout.LayoutParams lay = new RelativeLayout.LayoutParams(LayoutParams.MATCH_PARENT, LayoutParams.WRAP_CONTENT);
        lay.addRule(RelativeLayout.LEFT_OF, phoneNumber.getId());
        rl.addView(phoneNumber, lay);
        
        RelativeLayout.LayoutParams lay2 = new RelativeLayout.LayoutParams(RelativeLayout.LayoutParams.WRAP_CONTENT, RelativeLayout.LayoutParams.WRAP_CONTENT);
        lay.addRule(RelativeLayout.RIGHT_OF, phoneNumber.getId());
    	rl.addView(choosePhoneNumberFromContacts, lay2);
Ergebnis: [Bild1]

Was ich haben will, soll so aussehen: [Bild2]

Wie bekomme ich das hin?!
 

Anhänge

  • Bildschirmfoto_2.png
    Bildschirmfoto_2.png
    938 Bytes · Aufrufe: 117
  • cvbchg.png
    cvbchg.png
    1 KB · Aufrufe: 1.101
Keiner einer Idee? :(
 
Sorry, ich hatte es Freitag nicht mehr geschafft, weil ich Feierabend hatte und es auf die schnelle mit dem RelativeLayout bei mir nicht geklappt hat ...

Hier die Lösung mit TableLayout und TableRow:

Code:
		TableLayout tabLayout = new TableLayout(this);
		LayoutParams relParams = new LayoutParams(LayoutParams.FILL_PARENT, LayoutParams.WRAP_CONTENT);
		tabLayout.setColumnStretchable(0, true);
		tabLayout.setLayoutParams(relParams);

		TableRow tabRow = new TableRow(this);
		android.widget.TableRow.LayoutParams rowParams = new android.widget.TableRow.LayoutParams(android.widget.TableRow.LayoutParams.FILL_PARENT, android.widget.TableRow.LayoutParams.WRAP_CONTENT);
		tabRow.setLayoutParams(rowParams);

		EditText editContacts = new EditText(this);
		android.widget.TableRow.LayoutParams editParams = new android.widget.TableRow.LayoutParams(android.widget.TableRow.LayoutParams.WRAP_CONTENT, android.widget.TableRow.LayoutParams.WRAP_CONTENT);
		editContacts.setLayoutParams(editParams);
		editContacts.setText("Test 1234");
		tabRow.addView(editContacts);
		
		Button btnContacts = new Button(this);
		android.widget.TableRow.LayoutParams buttonParams = new android.widget.TableRow.LayoutParams(android.widget.TableRow.LayoutParams.WRAP_CONTENT, android.widget.TableRow.LayoutParams.WRAP_CONTENT);
		btnContacts.setLayoutParams(buttonParams);
		btnContacts.setText("Contacts");
		tabRow.addView(btnContacts);
		
		tabLayout.addView(tabRow);

Das entscheidende hier ist: tabLayout.setColumnStretchable(0, true)
Damit wird die Column 0 dehnbar gemacht. Es gibt auch Shrinkable als Gegensatz dazu.
 
  • Danke
Reaktionen: StefMa
Vielen dank, werde es heute abend mal testen ;-)

Selbes hatte ich auch schon mal probiert. Allerdings wusste ich nicht, das man mit stechcolumn auch einzeln spalten ansprechen kann oO

Danke und Gruß

Gesendet von meinem Galaxy Nexus mit der Android-Hilfe.de App
 

Ähnliche Themen

L
Antworten
4
Aufrufe
1.333
lonnie9020
L
W
  • waltsoft
Antworten
4
Aufrufe
938
waltsoft
W
A
Antworten
1
Aufrufe
881
koje71
koje71
Zurück
Oben Unten