H
hs1
Fortgeschrittenes Mitglied
- 15
Hallo Leute,
ich habe folgendes Problem, bei dem ich ziemlich auf dem Schlauch stehe und auf Eure Hilfe hoffe:
Ich arbeite in meiner App mit einer Activity und Fragmenten, welche dann entsprechend eingefügt werden. In einem Fragment hat der User die Möglichkeit ein Bild, welches er zuvor gemacht hat, zu bearbeiten.
In diesem Fragment wird auf der linken Seite ein LinearLayout mit Zeichenwerkzeugen angezeigt. Unten wird ein LinearLayout mit einer Farbauswahl angezeigt. Den restlichen Platz belegt ein ImageView.
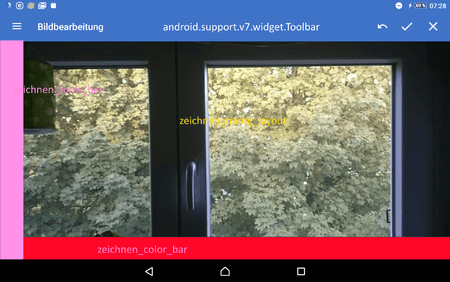
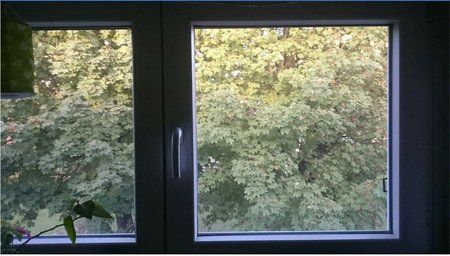
Nun habe ich das Problem, dass das Bild in der Höhe abgeschnitten wird. Es sieht für mich so aus, als würde das Bild um die Höhe der Toolbar abgeschnitten werden. Ich habe das ImageView mal auf eine feste Größe gesetzt (500 x 500), dann wird es komplett angezeigt. Es scheint meiner Meinung nach irgendwie am match_parent zu liegen.
XML-Code der Activitiy:
XML-Code des betroffenen Fragments:
Gruß hs1


ich habe folgendes Problem, bei dem ich ziemlich auf dem Schlauch stehe und auf Eure Hilfe hoffe:
Ich arbeite in meiner App mit einer Activity und Fragmenten, welche dann entsprechend eingefügt werden. In einem Fragment hat der User die Möglichkeit ein Bild, welches er zuvor gemacht hat, zu bearbeiten.
In diesem Fragment wird auf der linken Seite ein LinearLayout mit Zeichenwerkzeugen angezeigt. Unten wird ein LinearLayout mit einer Farbauswahl angezeigt. Den restlichen Platz belegt ein ImageView.
Nun habe ich das Problem, dass das Bild in der Höhe abgeschnitten wird. Es sieht für mich so aus, als würde das Bild um die Höhe der Toolbar abgeschnitten werden. Ich habe das ImageView mal auf eine feste Größe gesetzt (500 x 500), dann wird es komplett angezeigt. Es scheint meiner Meinung nach irgendwie am match_parent zu liegen.
XML-Code der Activitiy:
Code:
<?xml version="1.0" encoding="utf-8"?>
<android.support.v4.widget.DrawerLayout xmlns:android="http://schemas.android.com/apk/res/android"
                                        xmlns:app="http://schemas.android.com/apk/res-auto"
                                        xmlns:tools="http://schemas.android.com/tools"
                                        android:layout_width="match_parent"
                                        android:layout_height="match_parent"
                                        tools:context="de.test.MainActivity"
                                        android:id="@+id/main_drawer_layout">


    <!-- This LinearLayout represents the contents of the screen  -->
    <LinearLayout
        android:layout_width="match_parent"
        android:layout_height="match_parent"
        android:orientation="vertical">

        <!-- The ActionBar displayed at the top -->
        <android.support.v7.widget.Toolbar
            xmlns:android="http://schemas.android.com/apk/res/android"
            xmlns:app="http://schemas.android.com/apk/res-auto"
            android:id="@+id/main_toolbar"
            android:layout_height="wrap_content"
            android:layout_width="match_parent"
            android:fitsSystemWindows="true"
            android:minHeight="?attr/actionBarSize"
            app:theme="@style/ThemeOverlay.AppCompat.Dark.ActionBar"
            android:background="?attr/colorPrimaryDark">
        </android.support.v7.widget.Toolbar>

        <!-- The main content view where fragments are loaded -->
        <FrameLayout
            android:id="@+id/main_frame_layout"
            android:layout_width="match_parent"
            android:layout_height="match_parent" />
    </LinearLayout>


    <!-- The navigation drawer that comes from the left -->
    <!-- Note that `android:layout_gravity` needs to be set to 'start' -->
    <!-- app:itemBackground="@drawable/drawer_item_background"-->
    <android.support.design.widget.NavigationView
        android:id="@+id/main_navigation_view"
        android:layout_width="wrap_content"
        android:layout_height="match_parent"
        android:layout_gravity="start"
        android:background="@android:color/white"
        app:itemBackground="@android:color/white"
        app:headerLayout="@layout/main_navigation_view_header"
        app:menu="@menu/main_menu">
    </android.support.design.widget.NavigationView>
</android.support.v4.widget.DrawerLayout>
XML-Code des betroffenen Fragments:
Code:
<?xml version="1.0" encoding="utf-8"?>
<RelativeLayout
    xmlns:android="http://schemas.android.com/apk/res/android"
    xmlns:tools="http://schemas.android.com/tools"
    android:background="@color/background_zeichnen"
    android:layout_width="match_parent"
    android:layout_height="match_parent">

    <FrameLayout
        android:id="@+id/zeichnen_frame_layout"
        android:layout_toRightOf="@id/zeichnen_tools_bar"
        android:layout_above="@id/zeichnen_color_bar"
        android:layout_height="match_parent"
        android:layout_width="match_parent">

        <ImageView
            android:id="@+id/zeichnen_image_view"
            android:layout_width="match_parent"
            android:layout_height="match_parent"
            android:scaleType="fitXY" />
    </FrameLayout>

    <LinearLayout
        android:id="@+id/zeichnen_tools_bar"
        android:layout_alignParentLeft="true"
        android:layout_width="50dp"
        android:layout_height="match_parent"
        android:background="@color/background_zeichnen"
        android:visibility="visible"
        android:orientation="vertical">

        <include
            layout="@layout/zeichnen_werkzeugauswahl"/>
    </LinearLayout>


    <LinearLayout
        android:id="@+id/zeichnen_color_bar"
        android:layout_toRightOf="@id/zeichnen_tools_bar"
        android:layout_alignParentBottom="true"
        android:layout_width="match_parent"
        android:layout_height="wrap_content"
        android:background="@color/background_zeichnen"
        android:orientation="vertical">

          <include layout="@layout/zeichnen_farbauswahl" />
    </LinearLayout>
</RelativeLayout>
Gruß hs1


